Serving sailors online since 1997
CENTERBOARD INSPECTION and CABLE REPLACEMENT
posted 10-09-2015 by MccNeo
Click for larger view
I post this mod to potentially help others. I discovered not ALL Macs are the same.
I took my wife out sailing on father’s day 2015. Upon return to the dock, she departed in her own car for home. I worked to put the boat back on the trailer and move it to my parking space in the boat yard. When I pulled the center board line to retract the centerboard into the trunk, the stainless steel cable under the sink parted. I was able to put the boat back on the trailer easily enough. Thankfully, when I replaced the trailer bunks last year, I had the foresight to secure a carpeted board over the trailer axle. Now with the boat on the trailer and a broken cable, the centerboard rested directly on the carpeted board over the axle. I knew I could easily enough use a cargo strap to secure the centerboard in the retracted position if I chose to take the boat out before I was able to repair the cable. But, that isn’t how I typically roll. I wanted to repair the cable before I use the boat again. I went to the forums to see what I could find for others experiences to address the problem. I saw lots of examples where owners would lift the stern of the boat off the trailer or put it in the water and lower the centerboard to replace the cable. Contemplating the age of my boat and not knowing the maintenance history for the first 20 years (a 1994 model I bought in April of 2014 – now 21 years old at Fathers Day 2015), I decided it would be prudent to take the centerboard completely out and inspect the pivot bolt and board for wear. Everything I saw said look for two plugs on the bottom of the boat to gain access to the pivot bolt bracket bolts and use a bent wrench to remove the nuts. Once the nuts were removed, the bracket could be lowered out of the trunk.
I postulated several options to procure a replace cable but ultimately chose to contact Blue Water Yachts in Seattle to see if a replacement cable was readily available that met the specifications of the original cable. Of particular concern, I wanted to be sure the replacement cable was sufficiently flexible. None of the stainless cable available locally would be flexible enough. In the mean time, I looked for the bottom plugs and found none. I contacted Blue Water Yachts. Sure enough, they had a replacement cable with the thimbles, the inside bracket, and new bolt all assembled with new rope – available for a mere $30. They also had instructions for the replacement and a sketch of the attachment to the board. Perfect!. Then I asked them if they knew anything about the bottom access holes. Of course, they described exactly what I had seen in the forum. I told them I inspected my boat and it didn’t have the bottom access holes in the hull.
The gentleman then told me there were a number of boats that MacGregor ‘experimented on’ that had a different configuration for the pivot bolt. He then described two access holes inside the cabin, one easily visible on the cabin sole and the other under the sink. I had known there were access covers there but presumed they only allowed for inspection of the ballast tank. How wrong I was. They also permit access to the pivot bolt for the centerboard. Both covers must be removed to access the pivot bolt.
The pivot bolt goes through the sides of the trunk through the centerboard. There is no pivot bolt bracket with this configuration. All that is necessary is to use a common 9/16 inch wrench or socket to remove the nut and slip the bolt out. The bolt goes through a large 1/8 inch thick washer on each side of the trunk also.
After reading about methods to get the boat off the trailer, I decided I wanted a better, more convenient way. There is a lift at my disposal at my sailing club but it was in use. Looking at other empty trailers parked at the club that were considerably higher – keel boat configuration, I decided transferring my boat to a different trailer would provide me much more room to work under the boat and considerable clearance to permit removal of the centerboard from the trunk under the boat. This method would be much safer that working on the boat suspended from a hoist and much quicker than building any sort of cradle or use of shoring to lift the boat from my trailer.
I have attached pictures of the various areas of concern for the trunk, boat bottom, and cable path for this configuration.
Click for larger view

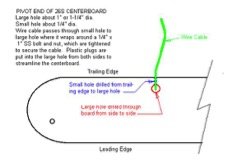
Figure 1: Centerboard diagram provided with an instruction sheet courtesy of Blue Water Yachts in Seattle Washington.

Click for larger view

Figure 2 Ballast tank inspection port cover before removal - typical of two. Screw heads were packed with sealant making use of screwdriver difficult. Vice grips on the heads removed them with ease. Good reason to use pan-head screws.
The access covers on my boat had obviously not been removed for a long time. Additionally, a previous owner resealed the covers with a liberal quantity of sealant before replacing the six stainless sheet metal screws to secure the cover. During the removal process, I found four screws on one cover had suffered a bit of corrosion but the Philips heads had also become embedded with sealant that would not be removed. A friend suggested using an easy-out but under the sink, there is no room to steady and accurately handle a drill – at least not with my skill. A pair of vice grips solved the screw removal problem. Thankfully no grinding was necessary. The sealant used on the other cover was a different story. The sealant used on this cover would not release the cover. It appears that it was 5200 series sealant. I used a sheet-rock taping knife to shear the sealant and get the cover off but I shredded and delaminated the fiberglass cover in the process – that is easy enough to fix.
The access covers on my boat had obviously not been removed for a long time. Additionally, a previous owner resealed the covers with a liberal quantity of sealant before replacing the six stainless sheet metal screws to secure the cover. During the removal process, I found four screws on one cover had suffered a bit of corrosion but the Philips heads had also become embedded with sealant that would not be removed. A friend suggested using an easy-out but under the sink, there is no room to steady and accurately handle a drill – at least not with my skill. A pair of vice grips solved the screw removal problem. Thankfully no grinding was necessary. The sealant used on the other cover was a different story. The sealant used on this cover would not release the cover. It appears that it was 5200 series sealant. I used a sheet-rock taping knife to shear the sealant and get the cover off but I shredded and delaminated the fiberglass cover in the process – that is easy enough to fix.

Click for larger view
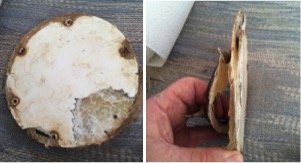
Figure 3 Inspection port cover after difficult removal. This cover was apparently installed by a previous owner using 5200 sealant. This result in shreding and delaminating the cover to during removal. This cover was located on the port side below the sole making removal difficult doe to the tight space and the tenacity of the sealant. It was replaced by fabricating a new cover from 1/4 inch plexi-glass.

Click for larger view

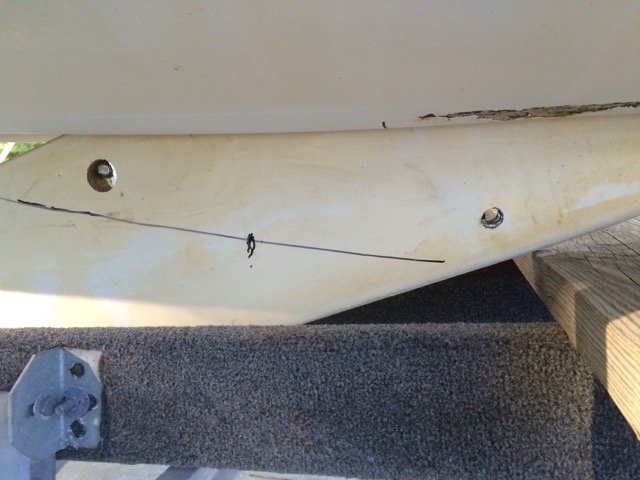
Figure 4 Lines on the centerboard were scribed using a Sharpie to aid alignment when re-installing the centerboard- notice corresponding mark on hull. Pivot hole and cable hole were inspected for damage and elongation from use. Slight elongation was observed but judged to be only slight and reusable without repair. Pivot bolt hole is not visible in this image.
You can also see deep gel-coat and fiberglass damage in the photo that was hidden by the trailer bunk. The bunks were heavily rotted when the boat was purchased. The damage was a result of the trailer bunk bolting gouging the hull when the bunks collapsed from rot. The damage will be repaired.
You can also see deep gel-coat and fiberglass damage in the photo that was hidden by the trailer bunk. The bunks were heavily rotted when the boat was purchased. The damage was a result of the trailer bunk bolting gouging the hull when the bunks collapsed from rot. The damage will be repaired.
Click for larger view

Figure 5 Both ends of the Centerboard Pivot Bolt. A 9/16 ratcheting box wrench and 9/16 inch box combination wrench easily removed the stainless steel bolt.

Click for larger view
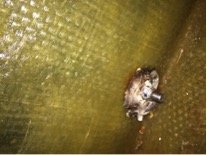
Figure 6 The bolt is 3/8 x 4-1/2 inches in length. A 1/8 inch thick concave washer is between the head and trunk or nut and trunk on each side. This bolt had a slight bend when removed and was replaced by a 5 inch long bolt and a washer stack to compensate for the additional length. Reinstallation included a rubber washer and liberal amount of silicone sealant when reinstalled.

Click for larger view
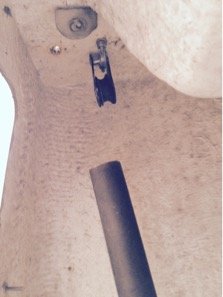
Figure 7 Under galley sink looking up at the turning block and bracket. The bracket is mounted on the centerboard cable before swaging ends. The tube aligns the cable through the trunk penetration.

Click for larger view

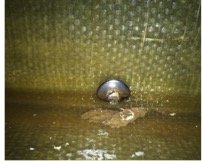
Figure 8 View shows ballast tank starboard side inspection port under galley sink. Tube aligns the centerboard cable for trunk penetration to centerboard below.